Published
- 8 min read
お金をかけずに、TerraformでAWSのVPC環境を準備する
EC2やRDSのインスタンスを建てるとお金がかかってしまうので、
今回は費用をかけずに、構築を予定しているAWS環境をTerraformで準備する方法をメモしておく。
#何ともケチくさいタイトルだ…
1.参考サイト
AWS PROVIDER(Terraform公式ドキュメント) HashiCorpの新オーケストレーションツールTerraformを試してみた Terraform でセキュリティグループを管理
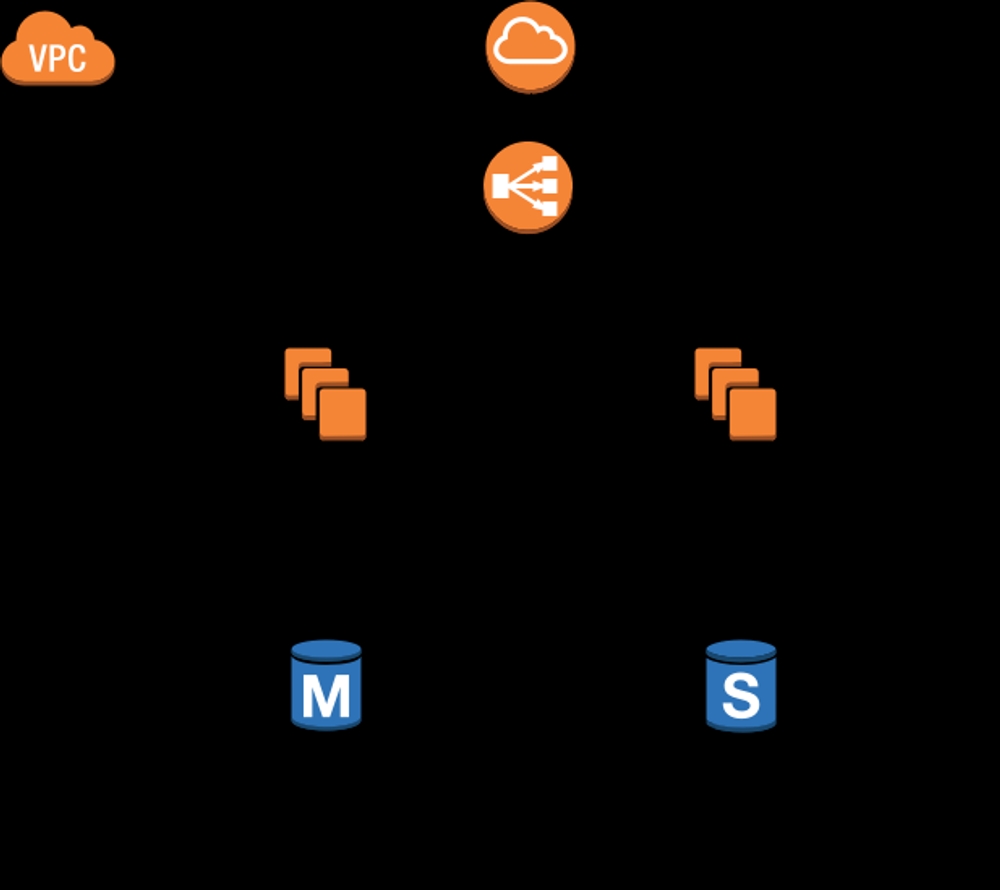
2.想定環境
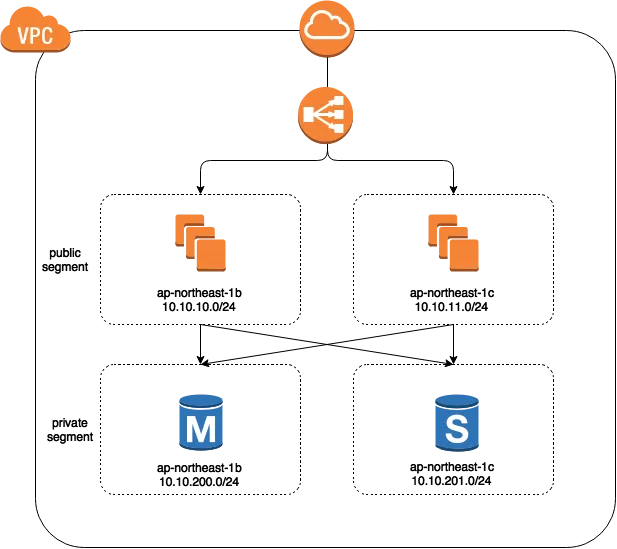
各セグメントの補足情報は、以下の通り
| SUBNET名 | ネットワーク体系 | セキュリティグループ | 備考 |
|---|---|---|---|
| – | – | ELB SG | ELBは今回建てない |
| public subnet1 | 10.10.10.0/24 | APP SG | EC2起動は今回の範囲外 |
| public subnet2 | 10.10.11.0/24 | APP SG | EC2起動は今回の範囲外 |
| private subnet1 | 10.10.200.0/24 | RDS SG | RDS起動は今回の範囲外 |
| private subnet2 | 10.10.201.0/24 | RDS SG | RDS起動は今回の範囲外 |
| セキュリティグループ名 | ポート | 許可IP | 備考 | | ---------------------- | -------- | ---------------- | -------------------------------- | --- | | ELB SG | 80/tcp | 0.0.0.0/0 | | | | APP SG | 8080/tcp | ELB SGからのみ | | | | 22/tcp | 任意のIPアドレス | ssh_allow_ipで許可したIPアドレス | | RDS SG | 3306/tcp | ELB APPからのみ | |
RDSは起動させないが、MultiAZを行うにあたって、RDSのsubnet groupの設定が必要になるので、ここまではTerraformで準備する。
3.Terraformインストール
- ダウンロードサイトから、Mac OS Xの64bit版zipをダウンロード
- /opt配下にディレクトリを解凍して、ディレクトリまるごと/opt配下にコピー
- シンボリックリンクを貼る
terraform -> /opt/terraform_0.5.3_darwin_amd64
terraformは結構頻繁に更新されるみたいなので、今後のバージョンアップに追随できるよう、/opt/terraformにシンボリックリンクを貼っておいた - PATHにterraformの場所を追記
export PATH=/opt/terraform:$PATH #terraform
私の場合、~/.zshrcに上記の追記を行った
4.AWS環境設定ファイル(terraform.tfvars)の準備
       #####################################
# TerraForm Variable Settings
#####################################
#AWS Settings
access_key = "[[ CHANGE ]]"
secret_key = "[[ CHANGE ]]"
region = "ap-northeast-1"
#App Name
app_name = "sample"
#Segment Settings
root_segment = "10.10.0.0/16"
public_segment1 = "10.10.10.0/24"
public_segment2 = "10.10.11.0/24"
private_segment1 = "10.10.200.0/24"
private_segment2 = "10.10.201.0/24"
#AZ Settings
public_segment1_az = "ap-northeast-1b"
public_segment2_az = "ap-northeast-1c"
private_segment1_az = "ap-northeast-1b"
private_segment2_az = "ap-northeast-1c"
#SG Settings
ssh_allow_ip = "[[ CHANGE ]]"
#KeyPair Settings
my_public_key = "[[ CHANGE ]]"
[[CHANGE]]の欄は、適宜書き換えてください。また、IPアドレス帯やAZについても(ry
5.各種定義ファイル(*.tf)の準備
私の場合、AWSの各種機能ごとにファイルを分割しました。
       #####################################
# Variable Settings
#####################################
#AWS Settings
variable "access_key" {}
variable "secret_key" {}
variable "region" {}
#App Name
variable "app_name" {}
#Segment Settings
variable "root_segment" {}
variable "public_segment1" {}
variable "public_segment2" {}
variable "private_segment1" {}
variable "private_segment2" {}
#AZ Settings
variable "public_segment1_az" {}
variable "public_segment2_az" {}
variable "private_segment1_az" {}
variable "private_segment2_az" {}
#SG Settings
variable "ssh_allow_ip" {}
#KeyPair Settings
variable "my_public_key" {}
       #####################################
# Provider Settings
#####################################
provider "aws" {
    access_key = "${var.access_key}"
    secret_key = "${var.secret_key}"
    region = "${var.region}"
}
       #####################################
# VPC Settings
#####################################
resource "aws_vpc" "vpc_main" {
    cidr_block = "${var.root_segment}"
    tags {
        Name = "${var.app_name}"
    }
}
#####################################
# Internet Gateway Settings
#####################################
resource "aws_internet_gateway" "vpc_main-igw" {
    vpc_id = "${aws_vpc.vpc_main.id}"
    tags {
        Name = "${var.app_name} igw"
    }
}
#####################################
# Public Subnets Settings
#####################################
resource "aws_subnet" "vpc_main-public-subnet1" {
    vpc_id = "${aws_vpc.vpc_main.id}"
    cidr_block = "${var.public_segment1}"
    availability_zone = "${var.public_segment1_az}"
    tags {
        Name = "${var.app_name} public-subnet1"
    }
}
resource "aws_subnet" "vpc_main-public-subnet2" {
    vpc_id = "${aws_vpc.vpc_main.id}"
    cidr_block = "${var.public_segment2}"
    availability_zone = "${var.public_segment2_az}"
    tags {
        Name = "${var.app_name} public-subnet2"
    }
}
#####################################
# Private Subnets Settings
#####################################
resource "aws_subnet" "vpc_main-private-subnet1" {
    vpc_id = "${aws_vpc.vpc_main.id}"
    cidr_block = "${var.private_segment1}"
    availability_zone = "${var.private_segment1_az}"
    tags {
        Name = "${var.app_name} private-subnet1"
    }
}
resource "aws_subnet" "vpc_main-private-subnet2" {
    vpc_id = "${aws_vpc.vpc_main.id}"
    cidr_block = "${var.private_segment2}"
    availability_zone = "${var.private_segment2_az}"
    tags {
        Name = "${var.app_name} private-subnet2"
    }
}
#####################################
# Routes Table Settings
#####################################
resource "aws_route_table" "vpc_main-public-rt" {
    vpc_id = "${aws_vpc.vpc_main.id}"
    route {
        cidr_block = "0.0.0.0/0"
        gateway_id = "${aws_internet_gateway.vpc_main-igw.id}"
    }
    tags {
        Name = "${var.app_name} public-rt"
    }
}
resource "aws_route_table_association" "vpc_main-rta1" {
    subnet_id = "${aws_subnet.vpc_main-public-subnet1.id}"
    route_table_id = "${aws_route_table.vpc_main-public-rt.id}"
}
resource "aws_route_table_association" "vpc_main-rta2" {
    subnet_id = "${aws_subnet.vpc_main-public-subnet2.id}"
    route_table_id = "${aws_route_table.vpc_main-public-rt.id}"
}
       #####################################
# Security Group Settings
#####################################
resource "aws_security_group" "elb_sg" {
    name = "ELB_SG"
    vpc_id = "${aws_vpc.vpc_main.id}"
    ingress {
        from_port = 80
        to_port = 80
        protocol = "tcp"
        cidr_blocks = ["0.0.0.0/0"]
    }
    egress {
        from_port = 0
        to_port = 0
        protocol = "-1"
        cidr_blocks = ["0.0.0.0/0"]
    }
    description = "ELB SG"
}
resource "aws_security_group" "app_sg" {
    name = "APP_SG"
    vpc_id = "${aws_vpc.vpc_main.id}"
    ingress {
        from_port = 8080
        to_port = 8080
        protocol = "tcp"
        security_groups = ["${aws_security_group.elb_sg.id}"]
    }
    ingress {
        from_port = 22
        to_port = 22
        protocol = "tcp"
        cidr_blocks = ["${var.ssh_allow_ip}"]
    }
    egress {
        from_port = 0
        to_port = 0
        protocol = "-1"
        cidr_blocks = ["0.0.0.0/0"]
    }
    description = "APP SG"
}
resource "aws_security_group" "rds_sg" {
    name = "RDS_SG"
    vpc_id = "${aws_vpc.vpc_main.id}"
    ingress {
        from_port = 3306
        to_port = 3306
        protocol = "tcp"
        security_groups = ["${aws_security_group.app_sg.id}"]
    }
    egress {
        from_port = 0
        to_port = 0
        protocol = "-1"
        cidr_blocks = ["0.0.0.0/0"]
    }
    description = "RDS SG"
}
       #####################################
# RDS Settings
#####################################
resource "aws_db_subnet_group" "default" {
    name = "${var.app_name}-RDS-subnet"
    description = "${var.app_name} MultiAZ"
    subnet_ids = ["${aws_subnet.vpc_main-private-subnet1.id}", "${aws_subnet.vpc_main-private-subnet2.id}"]
}
       #####################################
# KeyPair Settings
#####################################
resource "aws_key_pair" "sshkey" {
  key_name = "sample-key"
  public_key = "${var.my_public_key}"
}
6.Terraform実行
       $terraform plan
$terraform apply
$terraform show
の順番で実行。terraform showの実行結果で、最終的に作成された環境が表示される
7.お片づけ
terraform destroyを入力後、yesと入力して、環境を削除
       Do you really want to destroy?
  Terraform will delete all your managed infrastructure.
  There is no undo. Only 'yes' will be accepted to confirm.
  Enter a value: yes
注意点
destroyコマンドを実行しても、key_pairとRDSのsubnet groupは削除できませんでした(v0.5.3現在)
v0.6.0では、EC2のkey_pairとRDSのsubnet groupはdestroyでちゃんと削除されました
8.検証中メモ
8-1. 今回のサンプルファイル
上記のサンプルファイルは、github上にあげておきました。
https://github.com/CkReal/terraform_sample
8-2. graphオプションの結果
ちなみに、今回のterraformで準備した環境をterraformのgraphオプションで出力した結果は、以下の通り。
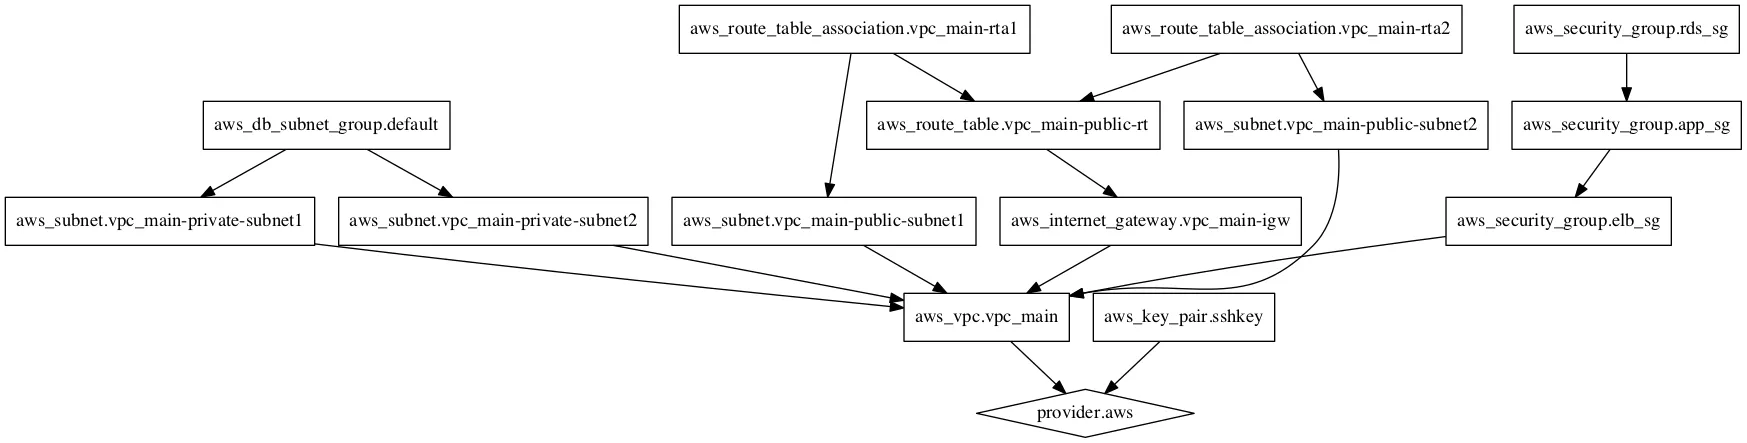
作成者は各リソース間に関する依存関係はわかるかなと思うけど、納品物として展開するのは厳しそうかな。
8-3. ATOMのシンタックスハイライトプラグイン
ATOMのプラグインにterraformのシンタックスハイライトプラグインがすでにあった。
https://atom.io/packages/language-terraform
8-4. terraform.tfstateの扱い
Terraformを実行すると、terraform.tfstateとterraform.tfstate.backupのファイルが生成される。
このファイルはTerraformの実行結果を管理しているため、複数人で作業するのであれば、何らかの方法で共有する必要がある。
ちなみに、この両ファイルを削除して、再びterraform applyすると、
添付ファイルのようにVPCが2重作成されたりして、とても困ったことになりますw
- VPC環境が2つ作成されてしまったの図

8-5. aws_security_groupのOutbound設定
https://www.terraform.io/docs/providers/aws/r/security_group.html
By default, AWS creates an ALLOW ALL egress rule when creating a new Security Group inside of a VPC. When creating a new Security Group inside a VPC, Terraform will remove this default rule, and require you specifically re-create it if you desire that rule.
( ・`ω・´)ナン…ダト!?
って訳で、最初ハマりました。egressでSGのOutBound設定を指定してあげましょう。